Homelab, Finally
Happy April Fools!
Go buy a Linus Coin, if they are still in stock.
How I finally managed to set up my very first actual home lab. This is not, in any means, a cost-effective or even a build that makes sense, but nevertheless it was a fun build.
Specs
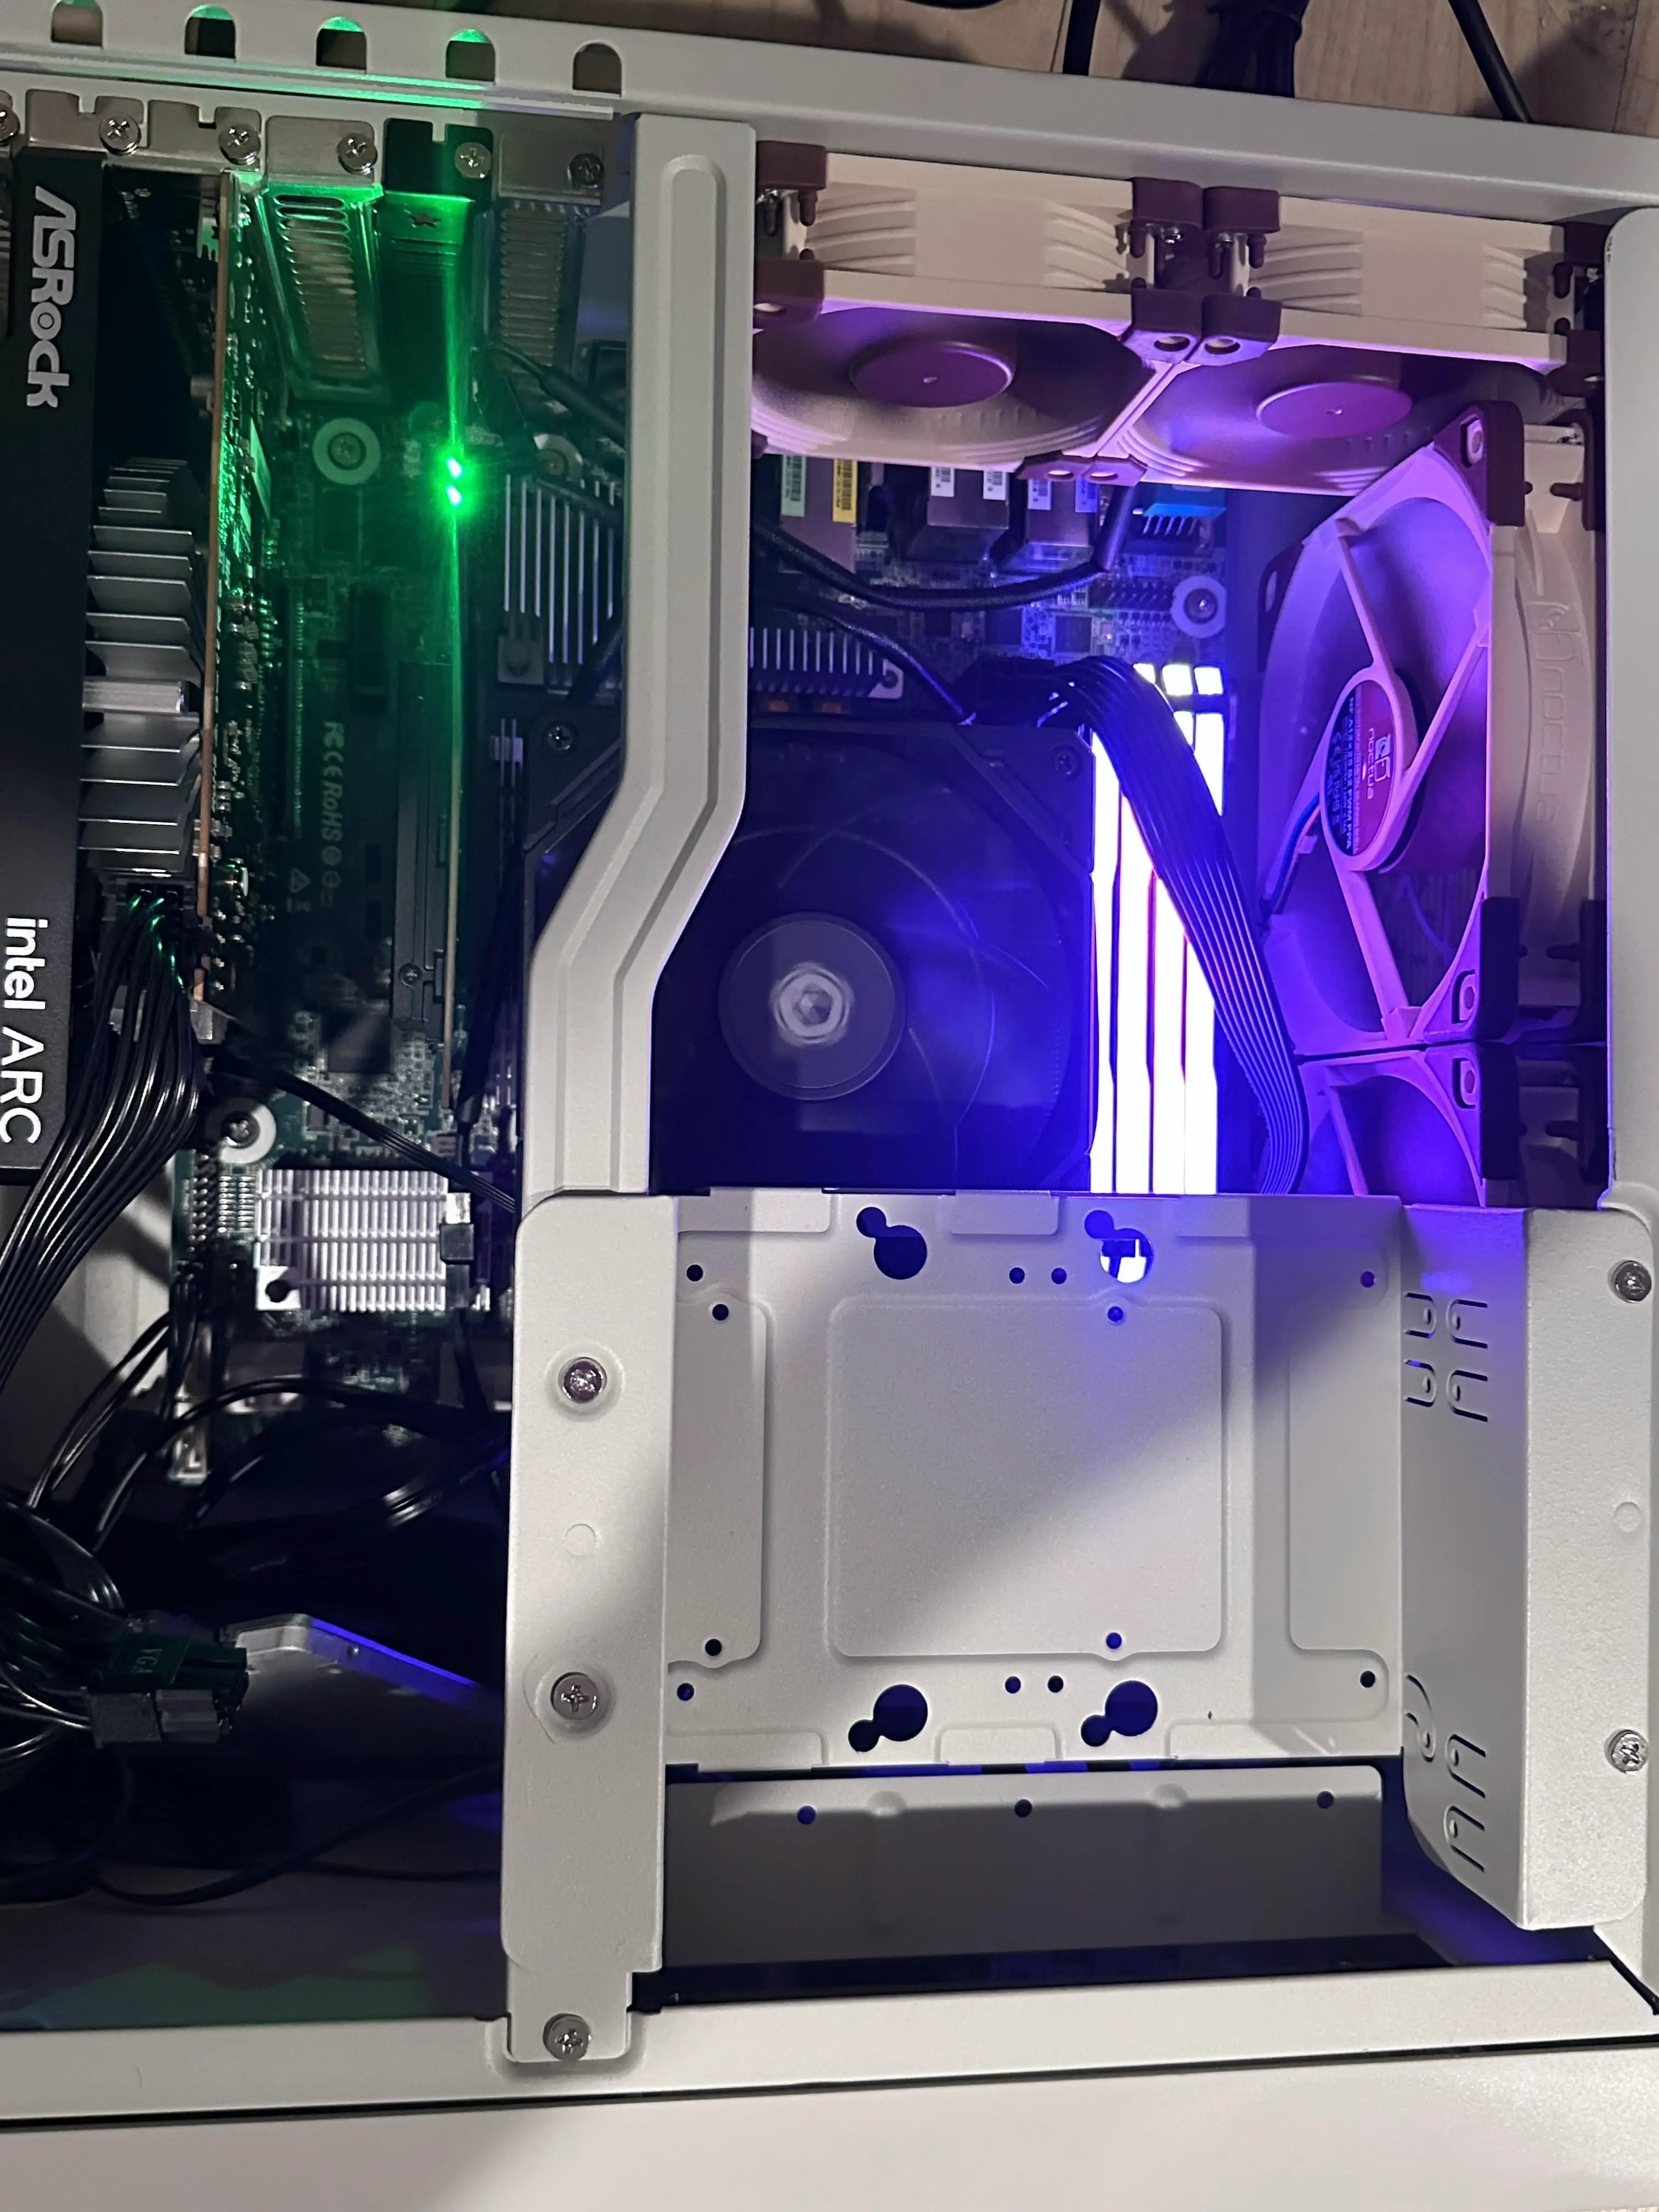
final build without the hdds
- Motherboard: AsRock Rack X570D4U-2L2T
- CPU: AMD RYZEN 5700X
- GPU: ASRock Intel ARC A380
- RAM: 32G * 4 DDR4 @ 3600Mhz
- Storage:
- Bootdrive: Intel S4510 240g
- ZFS: Corsair MP600 Pro 4TB * 4 (more on this later)
- HDD: 2x WD HC330 10TB, these were older versions with HGST labels.
- Case: SilverStone FLP01
- Cooling:
ID-Cooling IS-67-XT- ID-Cooling IS-55
- 2x Noctua NF-A12x25
- 2x Noctua NF-A8
- PSU: be quiet! PURE POWER 13 M 750W
Choice of Hardware
CPU: I happened to have some non-ECC ddr4 rams, ssds, and HDDs lying around, so those wasn’t an issue when building this setup. But this also means that I am basically stuck with consumer grade CPUs. As a long time
AMD fan boy, I initially picked the 5600GT, but later realized that it only supports PCIe 3.0. Wanting to keep the TDP at 65W, I ended up getting the 5700X.Motherboard: I initially picked a random (cheap enough) B550 board from ASUS. It turned out that this particular board ’s chipset only has 1x PCIe 3.0 x16 and its M.2 slot only supports PCIe 3.0 x4. For all four of my MP600s to run at “full speed”, this is not ideal. If remembered correctly, the 4.0 slot also reduce the bandwidth from x16 to x8 when both x16 slots are utilized (since 5700x does not include integrated graphics). Ultimately, the one who made those CPU expansion cards and P4 Combo came to rescue. Introducing AsRock Rack X570D4U-2L2T, a server motherboard that supports UDIMM and AM4 desktop CPUs, with dual 10Gbps ethernet ports.
Case: This is actually the most fun part of the build. I was going to make an ITX build, but ended up seeing the silverstone FLP01 retro-looking case. This case was originally an April Fools joke (coincidentally matching today’s date). This also means that I am no longer constrained to ITX boards.
GPU: I wanted something that is not super fancy, but relatively modern (so no old nvidia cards like P40 or P100). I am not running any local AI stuff with this server but I do want to run basic hardware acceleration features with it, so I picked up an Intel ARC 380 from ASRock.
PSU: since the build does not include a super GPU, I needed something that is efficient + quiet. Following the SPL’s PSU tier list, I picked the Pure Power 13M 750W from be quiet!
CPU Cooler: I initially picked the IS-67-XT from ID-Cooling since I had great experience with it for a different mini-ITX build with a 7800X3D. But it turned out that the 67 version is a few millimeter too tall if I also want to install the HDD rack from the FLP01 case. I ended up returning the 67mm version and replaced it with a IS-55. Clearance was a little tight, but it does fit.
Case Fans: I went way overkill for this. Threw in a bunch of Noctua fans.
Limitation of this build
Over-subscribed chipset PCIe 4.0 link
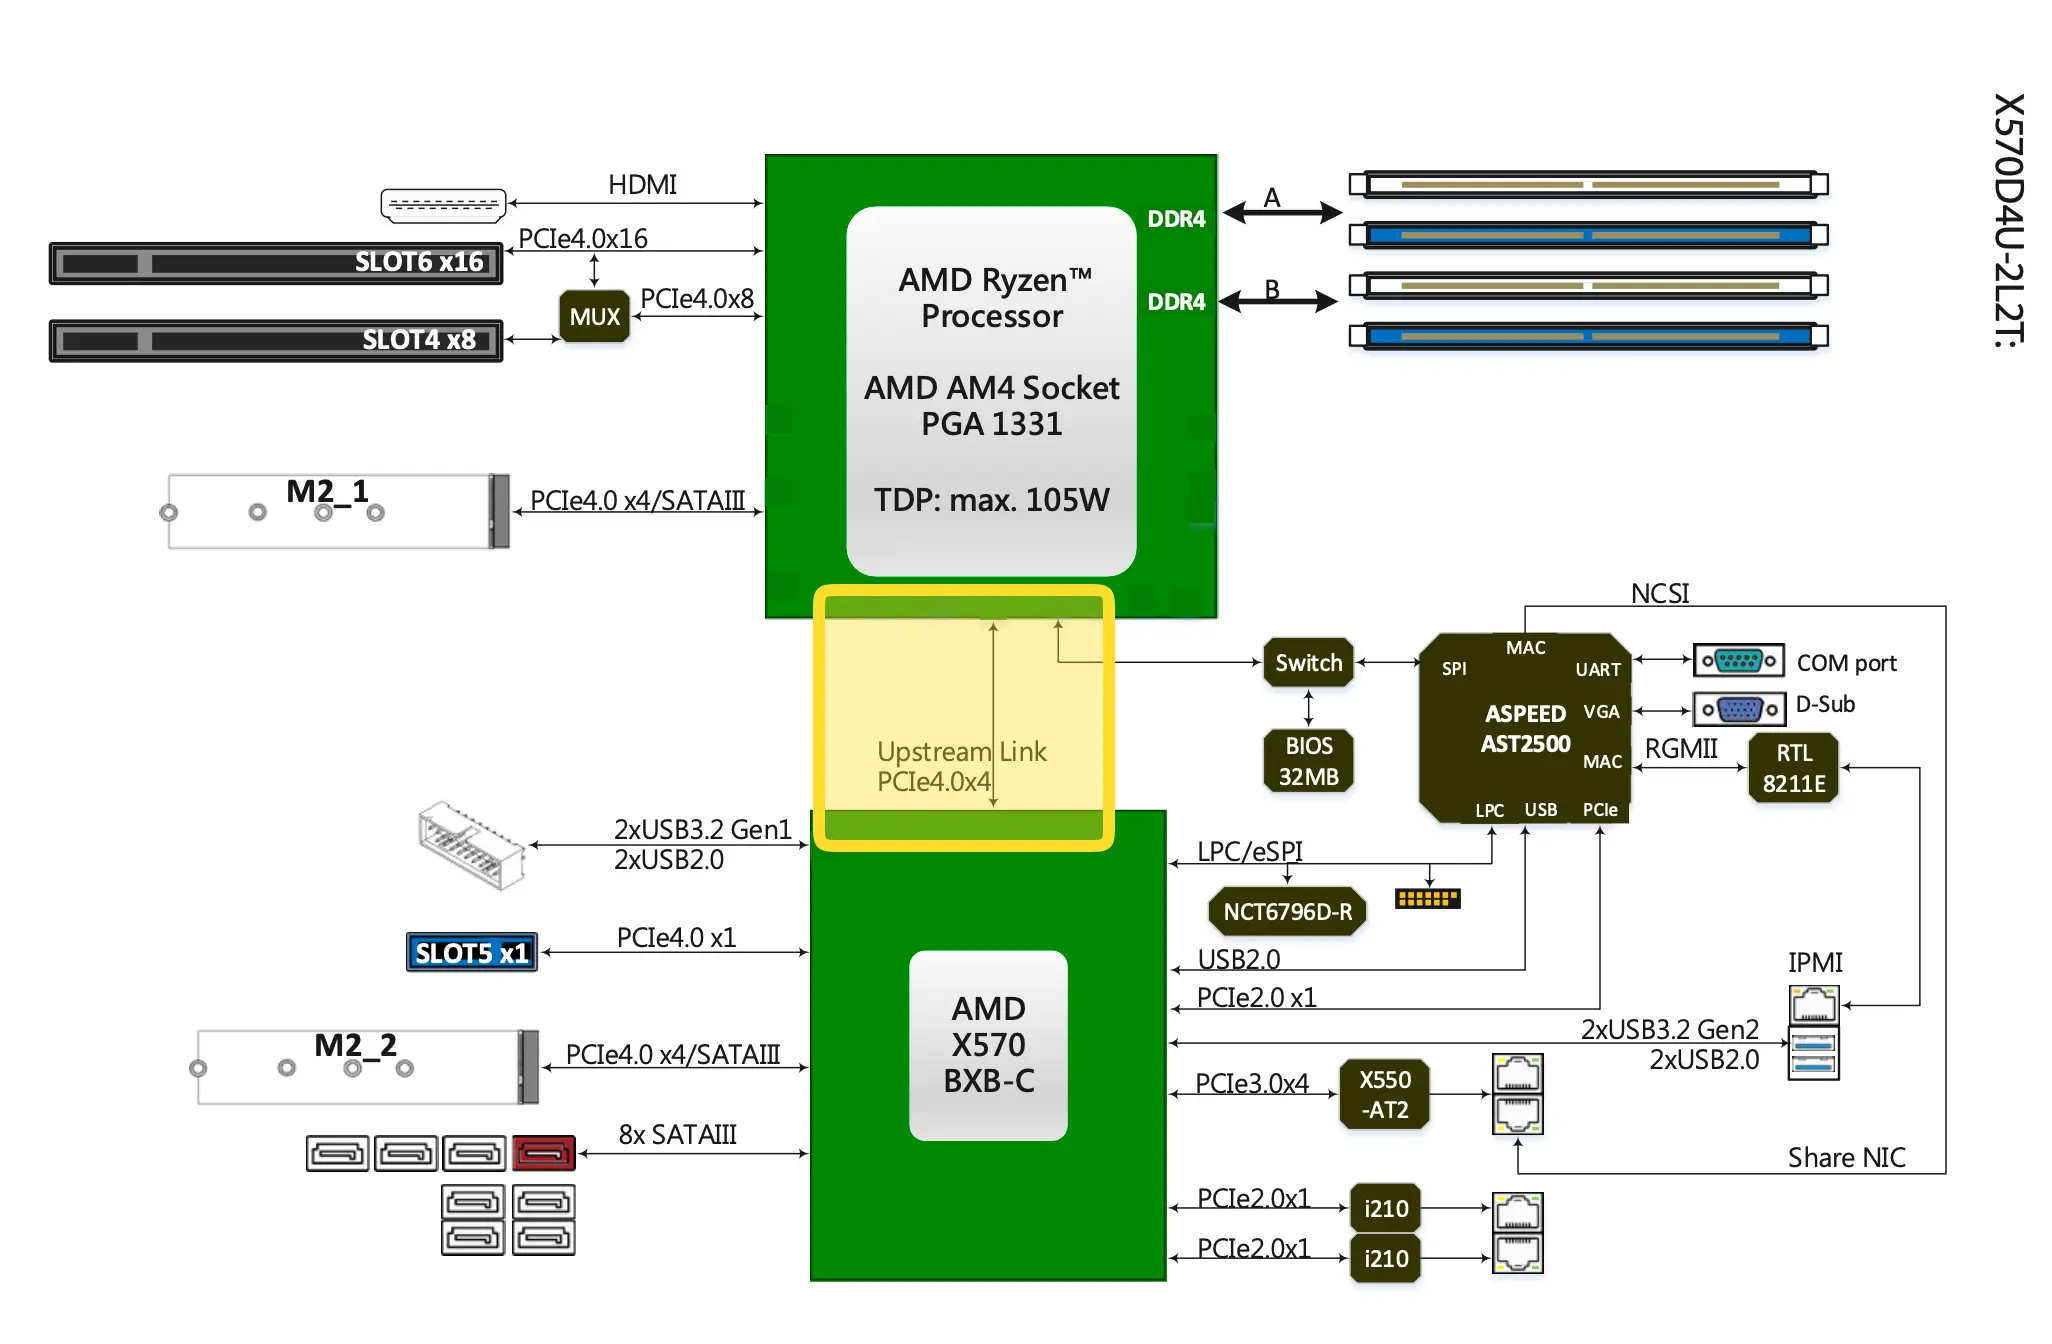
diagram courtesy of ASRock
As noted in ServeTheHome’s review of this board, the PCIe 4.0 x4 connection between the south bright and the CPU is over-subscribed:
The chipset is then connected with an x4 PCIe 4.0 link, and from there the chipset serves up the second M.2 slot, the x1 PCIe slot, and the PCIe lanes used by the networking controllers. This does mean that the chipset PCIe 4.0 link is oversubscribed, potentially by a large amount if all of the chipset-connected devices are simultaneously utilized.
— ServeTheHome: ASRock Rack X570D4U-2L2T Review an AMD Ryzen Server Motherboard
RAM only up to 3200Mhz
as mentioned on ASRock’s website:
- Supported DIMM Quantity 4 DIMM slots (2DPC)
- Supported Type Supports DDR4 288-pin ECC*/non-ECC UDIMM
- Max. Capacity per DIMM up to 32GB
- Max. DIMM Frequency up to 3200 MHz*
Setup
Considering that I might want to do random things with this server, I decided not to go with TrueNAS or other more focused OSes. I picked my favorite: Debian. At the time of this build, the latest version was Trixie 13.4.
0. PCIe bifurcation
When both X16 slots are utilized, slot 6 will auto switch to x8 when slot 4 is occupied. Instead of using a 4 slots NVMe adapter card, I used a dual NVMe adapter and put the other two ssds into the board’s m.2 slots. JEYI makes great quality expansion cards.
In BIOS, go to Advanced -> AMD PBS -> PCIE Slot 6 Link Width, change it to x4x4x4x4.
1. ZFS
The 4 M.2 SSDs were already configured in a zpool as a result of previous post.
One issue I have with ZFS is that by default the directory is mounted as root, the solution I currently have is by changing the mounting directory to a user owned path and then chown the datasets:
zfs set mountpoint=/home/debian/tank tank
chown -R debian:debian /home/debian/tank/
2. SecureBoot
Debian 13 came with Shim, therefore it was pretty easy to enable secure boot support. All I had to do was grub-install, then update-grub and reboot into BIOS to enable secure boot.
to check if secure boot is currently enabled:
mokutil --sb-stateto check the BootOrder:
efibootmgr -v
Signing Kernel Modules
Enabling secure boot will break the default zfs build, so we’ll need to self sign the zfs-kmod:
# genearte a MOK (machine owner key)
dkms generate_mok

# import the key
mokutil --import /var/lib/dkms/mok.pub
# set a passwd and do remember it
now reboot the system and hit enter when you see the blue enrollment dialog, enter the password you set earlier. After you boot into the system again:
# check if your key is enrolled:
mokutil --test-key /var/lib/dkms/mok.pub

dpkg-reconfigure zfs-dkms
update-initramfs -u -k all
useful notes
- How I Finally Got Secure Boot Working in Debian
- Signing Images and Kernel Modules on Debian for Secure Boot
- Switching on Secure Boot in Debian
3. LUKs and remote unlock with dropbear
Something I wrote before that helped me again during this build: unlock LUKS with Dropbear SSH public key
4. Tailscale for remote connection
I run my own tailscale control server using headscale. To authenticate, I first created a pre auth key from the server:
headscale users create homelab
headscale users list # homelab has uid 14
headscale preauthkeys create --user 14
and on the client side:
tailscale set --accept-dns=false
tailscale up --login-server <https://something.tld> --authkey <auth-key>
To make tailscale compatible with wireguard, add the following to the wireguard configuration:
PostUp = ip route replace 100.64.0.0/24 dev tailscale0 src 100.64.0.14
PostDown = ip route del 100.64.0.0/24 dev tailscale0 src 100.64.0.14
5. Immich
One of the reason I started this build was that Apple Photo sucks on non APFS disks and tends be very slow when the size goes above 1TB.
Immich is very easy to setup, all you really need is docker and some basic configurations following their official guide here. Here’s my modified version with Hardware-Accelerated Machine Learning enabled for Intel GPUs.
I wanted to use podman, but needed docker for something else (PrairieLearn).
I did not enable hardware transcoding since I do not really need it (and it’s still experimental).
docker-compose.yml (click to expand)
#
# WARNING: To install Immich, follow our guide: https://docs.immich.app/install/docker-compose
#
# Make sure to use the docker-compose.yml of the current release:
#
# https://github.com/immich-app/immich/releases/latest/download/docker-compose.yml
#
# The compose file on main may not be compatible with the latest release.

name: immich

services:
  immich-server:
    container_name: immich_server
    image: ghcr.io/immich-app/immich-server:${IMMICH_VERSION:-release}
    # extends:
    #   file: hwaccel.transcoding.yml
    #   service: cpu # set to one of [nvenc, quicksync, rkmpp, vaapi, vaapi-wsl] for accelerated transcoding
    volumes:
      # Do not edit the next line. If you want to change the media storage location on your system, edit the value of UPLOAD_LOCATION in the .env file
      - ${UPLOAD_LOCATION}:/data
      - /etc/localtime:/etc/localtime:ro
      - /tank/photos/:/mnt/photos
    env_file:
      - .env
    ports:
      - '2283:2283'
    depends_on:
      - redis
      - database
    restart: always
    healthcheck:
      disable: false

  immich-machine-learning:
    container_name: immich_machine_learning
    # For hardware acceleration, add one of -[armnn, cuda, rocm, openvino, rknn] to the image tag.
    # Example tag: ${IMMICH_VERSION:-release}-cuda
    image: ghcr.io/immich-app/immich-machine-learning:${IMMICH_VERSION:-release}-openvino
    extends: # uncomment this section for hardware acceleration - see https://docs.immich.app/features/ml-hardware-acceleration
       file: hwaccel.ml.yml
       service: openvino # set to one of [armnn, cuda, rocm, openvino, openvino-wsl, rknn] for accelerated inference - use the `-wsl` version for WSL2 where applicable
    volumes:
      - model-cache:/cache
    env_file:
      - .env
    restart: always
    healthcheck:
      disable: false

  redis:
    container_name: immich_redis
    image: docker.io/valkey/valkey:9@sha256:3eeb09785cd61ec8e3be35f8804c8892080f3ca21934d628abc24ee4ed1698f6
    healthcheck:
      test: redis-cli ping || exit 1
    restart: always

  database:
    container_name: immich_postgres
    image: ghcr.io/immich-app/postgres:14-vectorchord0.4.3-pgvectors0.2.0@sha256:bcf63357191b76a916ae5eb93464d65c07511da41e3bf7a8416db519b40b1c23
    environment:
      POSTGRES_PASSWORD: ${DB_PASSWORD}
      POSTGRES_USER: ${DB_USERNAME}
      POSTGRES_DB: ${DB_DATABASE_NAME}
      POSTGRES_INITDB_ARGS: '--data-checksums'
      # Uncomment the DB_STORAGE_TYPE: 'HDD' var if your database isn't stored on SSDs
      # DB_STORAGE_TYPE: 'HDD'
    volumes:
      # Do not edit the next line. If you want to change the database storage location on your system, edit the value of DB_DATA_LOCATION in the .env file
      - ${DB_DATA_LOCATION}:/var/lib/postgresql/data
    shm_size: 128mb
    restart: always
    healthcheck:
      disable: false

volumes:
  model-cache:
Reverse proxying with nginx
nginx was installed using their official repo for better feature support.
I used a self-signed certificate: openssl req -x509 -newkey rsa:4096 -keyout key.pem -out cert.pem -sha256 -days 365 -nodes
immich.conf (click to expand)
server {
    listen 443 ssl;
    listen [::]:443 ssl;
    http2 on;

    server_name <ip>;

    # allow large file uploads
    client_max_body_size 50000M;

    # disable buffering uploads to prevent OOM on reverse proxy server and make uploads twice as fast (no pause)
    proxy_request_buffering off;

    # increase body buffer to avoid limiting upload speed
    client_body_buffer_size 1024k;

    proxy_set_header Host              $host;
    proxy_set_header X-Real-IP         $remote_addr;
    proxy_set_header X-Forwarded-For   $proxy_add_x_forwarded_for;
    proxy_set_header X-Forwarded-Proto $scheme;

    # enable websockets: http://nginx.org/en/docs/http/websocket.html
    proxy_http_version 1.1;
    proxy_redirect     off;

    # set timeout
    proxy_read_timeout 600s;
    proxy_send_timeout 600s;
    send_timeout       600s;


    ssl_certificate           /etc/nginx/cert/cert.pem;
    ssl_certificate_key       /etc/nginx/cert/key.pem;

    ssl_protocols             TLSv1.2 TLSv1.3;
    ssl_ciphers               ECDHE-ECDSA-AES128-GCM-SHA256:ECDHE-RSA-AES128-GCM-SHA256:ECDHE-ECDSA-AES256-GCM-SHA384:ECDHE-RSA-AES256-GCM-SHA384:ECDHE-ECDSA-CHACHA20-POLY1305:ECDHE-RSA-CHACHA20-POLY1305:DHE-RSA-AES128-GCM-SHA256:DHE-RSA-AES256-GCM-SHA384;

    location / {
        proxy_pass http://127.0.0.1:2283;
        proxy_set_header   Upgrade    $http_upgrade;
	proxy_set_header   Connection "upgrade";
    }
}
6. Monitoring
apt -y install lm-sensors fancontrol intel-gpu-tools

# detect sensors
sensors-detect

# show gpu status
intel_gpu_top
7. remote backup with restic
I wrote a script for remote restic backup with iDrive E2, note this was based on fish.
rbk (click to expand)
#!/usr/bin/fish

set -lx AWS_SECRET_ACCESS_KEY <access-key>
set -lx AWS_ACCESS_KEY_ID <key-id>
set -lx s3_endpoint "s3:https://s3.us-west-1.idrivee2.com/<bucket-name>"

set snapdate (date +"%Y-%m-%d-%H%M%S")
set dataset tank/<dataset-name>

set snapname $dataset@$snapdate
set mountpoint (zfs get -H -o value mountpoint $dataset)
set snapdir "$mountpoint/.zfs/snapshot/$snapdate"

echo "Creating snapshot: $snapname"
zfs snapshot $snapname; or begin
    echo "snapshot failed"
    exit 1
end

echo "Mounting snapshot: $snapname"
zfs mount $snapname 2>/dev/null

if not test -d $snapdir
    echo "Snapshot path not found: $snapdir"
    exit 1
end

echo "Backing up: $snapdir"

restic -r $s3_endpoint --verbose backup $snapdir --exclude ".DS_Store"; or begin
    echo "restic backup failed"
    exit 1
end

restic -r $s3_endpoint forget --keep-daily 7 --keep-weekly 4 --keep-monthly 12 --prune; or begin
    echo "forget/prune failed"
    exit 1
end

echo "remote backup to idrive e2 finished"
8. Samba file sharing
Since I have a lots of Apple devices, I added the following to my /etc/samba/smb.conf:
[global]
   # disable insecure cryptos
   server min protocol = SMB3
   obey pam restrictions = yes
   usershare allow guests = no

   # better supporting apple extended attributes
   ea support = yes
   vfs objects = catia fruit streams_xattr
   fruit:aapl = yes
notes:
9. Disabling RGB
Corsair made these nice RGB rams, but since FLP01 does not come with a glass side panel and having rgb coming out from fan filter does not look that nice. Since openrgb supports my ram, it was pretty easy to disable it.
Currently, this does not work with the ASRock board, the following were based on the old B550F that I returned.
setting up openrgb
# getting i2c dependencies
apt -y install i2c-tools libi2c-dev

# load the i2c-dev module and i2c drivers
modprobe i2c-dev
modprobe i2c-piix4

# for automatically loading at boot time:
touch /etc/modules-load.d/i2c.conf
echo "i2c-dev" >> /etc/modules-load.d/i2c.conf
echo "i2c-piix4" >> /etc/modules-load.d/i2c.conf

# getting the latest openrgb:
wget https://codeberg.org/OpenRGB/OpenRGB/releases/download/release_candidate_1.0rc2/openrgb_1.0rc2_amd64_trixie_0fca9
3e.deb

# install it:
dpkg -i openrgb_1.0rc2_amd64_trixie_0fca93e.deb
apt -y install -f
Alternative solution for Corsair USB products is that you can install iCUE using a VM, refer to this post.
Disabling RGB
# Lists every compatible device with their number
openrgb -l

# for my ram, disabling it requires:
openrgb -d 3 -m Direct -c 000000
openrgb -d 2 -m Direct -c 000000
openrgb -d 1 -m Direct -c 000000
openrgb -d 0 -m Direct -c 000000
notes
a. VMs
Since I might need these later:
systemctl enable libvirtd
apt -y install qemu-kvm libvirt-daemon-system libvirt-clients bridge-utils virt-manager
b. firewall
good old ufw.
#Fun #Luks #Randomstuff #Ssh #System #Disk #Linux #OpenZFS #Self-Hosting